
Essential Guide on How to Clean Dog Ears Safely and Gently
|
|
Time to read 9 min
|
|
Time to read 9 min
Keeping your dog’s ears clean isn’t just about hygiene—it’s about health. Many dog owners underestimate how essential ear cleaning is to their furry friend’s overall well-being. Ear infections are one of the most common reasons dogs end up at the vet, but the good news is that most of these problems are preventable with a little routine care to avoid infections.
In this guide, we’ll break down everything you need to know about cleaning your dog’s ears—vet-approved tips, step-by-step instructions, signs of ear problems, and mistakes to avoid. Whether you’ve got a floppy-eared Golden Retriever or a pointy-eared German Shepherd, clean ears equal a happier, healthier dog.
Table of content
Dogs’ ears are more complex than human ears. To properly clean dog ears, it is important to understand their structure. Their ear canals are L-shaped, which makes it easier for debris and moisture to get trapped. Left unchecked, this can lead to:
Ear infections
Yeast overgrowth
Ear mites
Hearing loss
Chronic irritation or scratching
The structure of a dog's ear canal complicates the expulsion of debris without external cleaning aid, which can lead to discomfort and infections if neglected.
Ear infections can occur due to allergies or parasites in dogs.
Some breeds—like Cocker Spaniels, Basset Hounds, and Poodles—are especially prone to ear issues due to their floppy ears or hairy ear canals, which reduce airflow and create the perfect environment for bacteria. Dogs with droopy ears require more regular ear cleaning due to increased moisture and debris retention.
Even if your dog doesn’t fall into a high-risk category, regular ear cleaning can help prevent painful infections and expensive vet visits. It is recommended to clean a dog’s ears after swimming or bathing to remove excess moisture.
Not all dogs need their ears cleaned on a schedule. Some need it weekly, others monthly, and some only rarely. But certain signs are clear indicators that you need to clean your dog's ears:
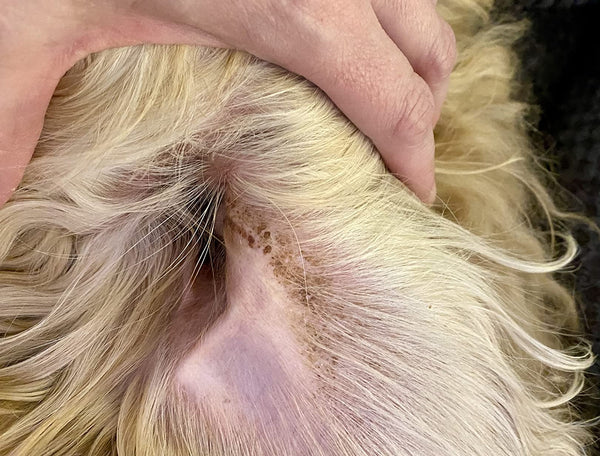
A strong odor coming from the ears
Brown, yellow, or black discharge
Redness or inflammation
Excessive scratching or rubbing
Shaking head frequently
Whimpering or signs of discomfort when touching ears
If you notice these signs along with swelling or a foul smell, it could be an infection—and it’s best to see your vet before attempting a cleaning. Contact your veterinarian if your dog’s ear appears red and inflamed.
Before you begin, make sure you have the right tools on hand. Vets recommend the following:
Dog-specific ear cleaner (avoid hydrogen peroxide, EDTA or any alcohol-based solutions)
High-quality ear cleaning solution (to prevent infections and manage wax buildup)
Cotton balls or gauze pads
Treats (positive reinforcement helps!)
Towel (to keep things tidy)
Optional: Hemostats for removing ear hair in certain breeds (only with guidance)
Using a good quality ear cleaning solution is essential for maintaining your dog's ear hygiene. These solutions often have antibacterial or antifungal properties that help prevent infections and ensure effective cleaning.
Important: Never use Q-tips or insert anything deep into your dog’s ear canal. You risk damaging the eardrum or pushing debris further in. Use cotton balls or gauze to clean a dog’s ears instead of Q-tips or cotton-tipped applicators.
RECOMMENDED PRODUCT
Gentle Non-Sting Ear drops for Dogs and Cats work immediately. depending on the severity of the infection use 2-3 times a day at least a few days till you notice a reduction in symptoms.
Kills some of the toughest Yeast, Bacteria causing itch, odor, inflammation and pus.
Eliminates Painful Ear Infections and Stops Chronic itch within days.
Made with USDA Organic Certified Non-Toxic ingredients.
Cruelty Free, No Animal Testing.
Visible results in 7- 10 days of regular use.
100% Money back guarantee.
Here’s a safe and vet-approved method for cleaning your dog's ears at home: Cleaning your dog's ears can be done at home if the dog is comfortable and well conditioned for the process.
After you have finished cleaning, make sure to apply any prescribed ear drops promptly to ensure effective absorption. Proper ear handling is crucial during this process to prevent any discomfort or injury. Reward your dog with treats and positive reinforcement immediately after finished cleaning to make the experience more pleasant for them.
Pick a quiet moment when your dog is relaxed. Use a non-slip surface and have everything within arm’s reach. If your dog is nervous or fidgety, you might need someone to help you hold them still.
Before applying any cleaner, look into the ear for signs of infection or injury. If you see swelling, pus, a bad smell, or your dog appears in pain, stop and consult your vet.
Gently lift your dog’s ear flap (also called the pinna) and squeeze a few drops of the ear cleaner into the ear canal. Follow the instructions on the bottle for dosage.
This part is important—gently massage the base of the ear for 20–30 seconds. You’ll hear a squishing sound as the solution loosens debris inside the canal.
Stand back! Your dog will likely shake their head, which helps bring debris to the outer part of the ear. This is a good thing—it’s part of the cleaning process.
Use a cotton ball or gauze to gently wipe the visible part of the ear canal and inside the ear flap. Don’t push anything deep inside the ear.
Give a treat, some praise, and a scratch behind the ear. This turns ear cleaning into a more positive experience.
There’s no one-size-fits-all rule, but here are general guidelines for a routine ear clean: Regular ear examinations will help catch any problems before they worsen.
It is important to regularly check your dog's ears as part of routine care to identify potential health issues such as ear infections.
Floppy-eared or long-haired breeds : Once a week
Active outdoor dogs : Every 1–2 weeks
Swimmers : After every swim
Short-haired, indoor dogs : Once a month or as needed
If you’re unsure, ask your veterinarian for a personalized recommendation based on your dog’s breed, age, and activity level.
Many dog owners unknowingly make mistakes that can cause more harm than good. Here’s what not to do:
Using cotton tip applicators can be risky as they may perforate the ear drum. It is crucial to maintain ear health and avoid any actions that could compromise the integrity of the ear drum. Always consult a veterinarian for proper ear cleaning techniques.
Over cleaning your dog's ears can lead to irritation and potential infections in the ear canal. It is important to understand the signs that indicate when cleaning is needed and to avoid exacerbating existing issues by over-cleaning.
Read the ingredients label and avoid alcohol, EDTA, vinegar, hydrogen peroxide, or homemade solutions unless your vet approves. These can irritate sensitive ear tissue.
Never insert cotton swabs into the ear canal. You can damage the eardrum or push debris further in.
Excessive cleaning can cause dryness and irritation. Always clean only when necessary or based on your vet’s guidance.
Especially after swimming or bathing, trapped moisture can lead to infections. Always dry ears thoroughly after exposure to water.
Cleaning is meant for maintenance , not treatment . If your dog has an ear infection, cleaning alone won’t fix it—and might make things worse. Proper ear treatment is essential to address any infections effectively.
It's crucial to identify the underlying cause of ear problems, such as ear conformation, allergies, or parasites. Without addressing these underlying issues, ear discomfort or infections may recur, making it essential for pet owners to monitor their dog's ear health and seek veterinary advice when changes are observed.
Contact your vet if you notice:
Persistent bad odor
Blood or pus-like discharge
Visible swelling or heat
Extreme head shaking or scratching
Pain when touching the ears
Loss of balance or tilting the head
Veterinarians may prescribe ear drops, oral antibiotics, or a professional ear flush depending on the diagnosis.
These breeds trap moisture more easily. Weekly checks and cleaning are a must.
These dogs often grow hair inside the ear canal. Trimming or plucking (by a groomer or vet) may be necessary for airflow and cleanliness.
Moisture is the enemy. Always dry ears thoroughly and use a drying ear rinse after water activities.
You’ll find many DIY recipes online—like vinegar and water or green tea rinses—but not all are safe. Some may disrupt the natural pH balance or irritate the ear.
Waxy buildup can lead to infections and other ear problems, so it's crucial to use appropriate products for routine maintenance and inspections.
If you’re looking for a natural cleaner, choose Petglow Natural ear solution.
Not all dogs enjoy having their ears touched, but you can train them to accept it.
Start by touching the ears gently during cuddle time.
Gradually introduce the ear cleaner bottle without using it—just let them sniff it.
Practice short, positive sessions with treats and praise.
Avoid forcing or rushing the process—go slow and be consistent.
Proper training is crucial for the effective application of ear medication, ensuring that your dog remains calm and cooperative during treatment.
Over time, many dogs grow to tolerate or even enjoy their ear cleaning routine.
RECOMMENDED PRODUCTS
Persistent head shaking or scratching
Unpleasant odor from ears
Discharge or excessive wax buildup
Swelling, redness, or signs of pain
Hearing changes or balance issues
A clean ear isn’t just a pretty one—it’s a healthy one for your pets. By learning how to clean your dog’s ears the vet-approved way, you can prevent infections, save on vet bills, and keep your best friend comfortable and happy.
It only takes a few minutes each week to make a big difference. The keys are using the right tools, knowing your dog’s needs, and recognizing when to ask your vet for help. Ear cleaning helps decrease debris, bacteria, and yeast inside the ear.
So grab your cleaner, a handful of treats, and show those ears some love—your dog will thank you with tail wags and wet kisses.
About Dr. Alex
Dr. Alex is RCVS accredited Veterinary surgeon and consultant currently practicing at a small animal veterinary practice in the U.K. He achieved his degree In veterinary medicine from the Royal Veterinary College (one of the top 3 vet schools in the world) and has a keen interest and skill in writing. He loves to write veterinary related articles by providing the most up to date and scientifically accurate information in an easy to consume format for pet owners. He can cover a range of topics and is passionate about educating owners worldwide!
Pet owners should avoid using baby wipes for cleaning inside a dog’s ears. They may contain fragrances or chemicals that can irritate sensitive ear tissue. Use a vet-approved ear cleaner and gauze or cotton balls instead.
Take it slow, use lots of positive reinforcement, and consider breaking the process into short sessions. For particularly anxious dogs, consult your vet or a dog trainer for desensitization techniques.
Most ear infections aren’t contagious, but some caused by mites or specific bacteria could potentially spread. Keep an infected dog away from others until cleared by a vet.
Brown discharge is often a sign of yeast, wax buildup, or ear mites. It’s best to have it checked by your vet to rule out infection.


